Monday, January 31, 2011

beef-stuffed green peppers


Forgive me blogger, for I have sinned, it has been 2 weeks since my last blog-addition. I actually made this recipe like over two weeks ago, just have been pretty busy. So here we go. I prepared this for 4 servings.

4 green peppers
11 oz ground beef - I think I actually used 1 lb though
4 tbsp chopped red onion
salt
1 (14.5 oz) can of whole peeled tomatoes (I used half of the can only and saved the other half)
3/4 tsp Worcestershire sauce
1/3 cup uncooked rice
1/3 cup water
2/3 cup shredded cheddar cheese
1 (14.5 oz) can tomato soup (I used Amy's Chunky Tomato Bisque)


I began by putting a large pot of water on the stove and heating it on high to boiling. While the water was heating I began doing all the chopping that was needing to be done. First things first - to cut the tops of the peppers off.


Once the tops were sliced off, I gutted all the innards out and made sure the seeds were all cleared


pepper innards
Once the water was boiling, I put the 4 peppers into the boiling water for about 5 minutes. That gave me a few minutes to chop the onion up. This is where I almost cut my finger off. No bueno. Apparently I am not good enough to where I can try to chop like the people on tv. So from now on I will slow my roll... or my chop.


After the five minutes of boiling, I removed the peppers, made sure there was no water lingering within, and set them to the side. I then sprinkled salt on the bottom of the peppers.

salted
Once the peppers were salted and off to the side, I sautéd the beef and onions in a large skillet (until the beef fully browned).


After the beef brownage, I drained the excess fat and added the tomatoes, rice, Worcestershire sauce, and 1/2 cup of water. I believe I threw some seasonin's on there too and stirred it up real nice. Oh, and I also made sure to separate the huge pieces of tomato up a little so the chunks weren't so big. Using a spatula worked well. I covered the whole mix and let it simmer for 15 minutes (until the rice was cooked tender).


Once the rice was ready, I removed it from the hot burner, and added the cheese (that I had already shredded off to the side somewhere) and mixed it all up. One thing I'd change next time is to add more cheese, possibly double the amount. The cheese is supposed to bubble to the top during baking, but (as you will see in the final photos) that did not happen for me. This is also the time when I began preheating the oven to 350°.

looks cheesy, but not quite cheesy enough apparently
The next step was to place the peppers into a baking dish and stuff the peppers with the beef mixture. Carefully, after being boiled, the peppers can tear. 


Next I poured the tomato bisque over the tops of the peppers.


I covered them with aluminum foil and baked them at 350° for about 30 minutes. This is where the cheese is supposed to bubble up to the top.. which is why I say DOUBLE THE CHEESE!!

30-40 minutes later..

with mashed black beans. Yumazing!

Monday, January 17, 2011

baked kale chips


I found this recipe and these baked kale chips are supposed to be way better for you than regular potato chips. Kale is supposed to be very nutritional. This recipe is extremely easy, so this blog addition should be fairly short. Ingredients:

1 bunch of kale
1 tbs olive oil
1 tspn seasoned salt


First I washed each kale leaf and dried it off thoroughly. Apparently a salad spinner should be used but I don't have one so I dried them all off with paper-towels. Once they were dried off, I cut them into chip-sized pieces and laid them out on parchment paper on a baking sheet. I had three sheets of chips because the bunch of kale was so huge, so actually for me 1 bunch of kale created 3x this recipe. 


leaf-chips?? wtf? damn hippies!!!

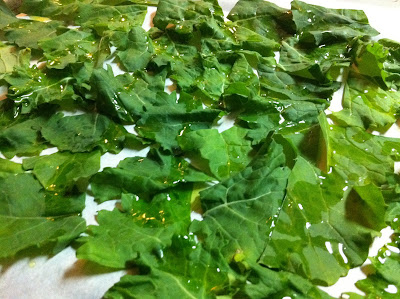
Once the chip-sized leaf clippings were laid out on the pan, I drizzled them with the 1 tablespoon of olive oil. To me the olive oil didn't go very far. Maybe I am not a great drizzler, but some of the chips did not get covered so I had to add another tablespoon of olive oil (this is still per pan of chips - so for all 3 pans I used a total of 6 tablespoons of oil). I was thinking if there is a way I could put oil in a little spray bottle, that would be a lot easier and efficient for affectively covering the chips with the right amount of oil. I will have to try that out next time. 

oil-drizzled

salt sprinkled, ready to go into the oven

So once they were drizzled with oil, I sprinkled them all with the 1 teaspoon of seasoned salt. Here is another definite adjustment I would make the next time I make these. In the end, the chips turned out pretty salty. 1 teaspoon doesn't sound like a lot of salt for a whole pan, but it is. Unless you just love salt.
Anyways, I used the 1 teaspoon of salt (per pan). Turned on the oven to 350 and once it was preheated put the baking sheet in the oven for around 10 minutes. I would say keeping them in any longer than 12 or 13 minutes would probably over-bake the leaves and they would turn to dust when you touch them.


The chips do come out pretty fragile and thin, just don't grab them like you're digging for popcorn and you'll be okay. They are very tasty, this batch just came out very salty. I highly recommend them. Yum Yum Yum!

Sunday, January 16, 2011

banana snickerdoodles


After tackling the banana apple pie I decided to go ahead and use the bananas some more since I got over-zealous and bought 2 bunches of bananas. I hate wasting bananas, therefore I decided to immediately make banana snickerdoodles. That is, replacing the shortening in the snickerdoodle recipe with mashed bananas.

First I began to mix together the 1 cup of mashed bananas with the 1 1/2 cups of white cane sugar. Then I realized I should be letting the mixer do this for me and I dumped it all into the mixer and got the 2 eggs ready. Next each egg went into the mix one at a time, mixing it well between each egg addition.


While the mixer was blending the above ingredients, I got a separate bowl and mixed together the 2 3/4 cups of flour, 1 teaspoon of baking soda, 2 teaspoons of cream of tartar and the 1/2 teaspoon of salt. I didn't use whole wheat flour but I wouldn't say this is one of those recipes that would be scary to use whole wheat. Especially since the bananas keep it super sticky, the wheat wouldn't have a chance to crumble the batter. 


Once the powdery mixture was well mixed, I began stirring it into the creamy mixture little by little. If I dumped it all in there at once the mixer would probably explode.


  • After a bit the mixture was nice and doughy, although still very sticky due to the bananas. I had another smaller bowl ready with the other 2 tablespoons of sugar and the 2 teaspoons of cinnamon - this is for rolling dough balls into. Actually, now I recall running out of that amount of cinnamon/sugar quicker than the time I made snickerdoodles with shortening. I think that was due to the fact of the amount of stickiness of the banana mix. So I would recommend upping it by at least double, if not more. I didn't keep record of how much I was adding.


  • So normally while making snickerdoodles, you pull a small golf-ball sized amount of dough out of the batter and roll it into a ball with your palms and then roll them around in the sugar mix. This is easy when plastic, I mean shortening, is involved. With bananas that is not really possible. So I just scooped out a good portion with a spoon and dropped it into the bowl of cinnamon/sugar. It didn't slide off the spoon, so excess batter is expected to stay on the spoon. However, once the dough scoop was resting in the mix, it was easily rolled around and covered. Now they were capable of becoming round balls and not sticking to everything. Once rolled and covered, I put them across my parchment paper-lined baking pan. While I was still rolling them all out, I preheated the oven to 375°.

easily rolled
bake time!

  • I tried to keep them at least an inch apart if I could since they sink down and expand some as they bake. I baked them for about 10 minutes, maybe 12, but no longer than that. Once they feel firm but not hard or burned, they are ready. It's always better to have moister, doughy cookies than dried hard ones [in my book]. Plus with bananas I was not sure what to expect. 

done
  •  
  • Trying them a while after they cooled, I have to say not bad. They don't taste like traditional snickerdoodles. They just taste like banana-flavored snickerdoodles. DUH. The consistency of banana nut muffins.


apple pie with banana crust


In my last post I said that I've been looking for healthy/natural alternatives to unhealthy ingredients. For a few months now I've been replacing corn syrup with honey in recipes such as pecan pie or brittle (and in my opinion it tastes way better - especially pecan pie!) but recently I have been reading about replacements for shortening. Did you know shortening was invented for use in making soap? It's true. So I read that mashed bananas can be used as a substitute for shortening and after I made Susie's apple pie with shortening I decided to try one for myself with the banana crust. I think it would be kind of odd to try a baking experiment and then give it away as a gift, ha ha, so therefore I tried it the traditional American way first and the hippie way second. So as usual here is the pie crust recipe, only now with bananas!:

2 cups flour
1 tsp salt
1 cup mashed bananas (approximately 2 whole bananas)
1/2 cup water

Threw it all together, mixed it up well via the mixer. This mix was WAYYYY stickier than using shortening. This was for sure an adventure, a *challenging* adventure. Just wait until I get to the part where I was rolling it out and trying to get it into the pie dish.. Anyways this time around as I was separating the dough into two balls and ziploc-ing them to go into the fridge I floured them so that way the dough wouldn't just stick to the baggie and I'd be S.O.L. That was a good idea since I didn't know yet exactly how sticky of a situation I was getting myself into. I let that sit in the fridge for at least 2 or 3 hours.

Now this time I only peeled and sliced two apples vs three because Susie's pie was heaping and I didn't want this one to be heaping. I wound up using 5 cups of apples but the cups weren't filled to the brim of the measuring cup either. Here are the ingredients for this time around:

3/4 cup white cane sugar
3 tbsp cornstarch
1/2 tsp ground cinnamon
 5 cups thinly sliced apples
1/2 cup caramel ice cream topping (I used Hershey's)
1/4 cup chopped pecans

Yeah, I used the corn-syrupy caramel ice cream topping again this time, so I can't claim that this pie is 100% natural and organic, but step by step I'm working my way there. I'm sure there is organic caramel at Whole Foods or somewhere but I just haven't went looking for it yet.
So after slicing the apples, I once again mixed the sugar, cornstarch and cinnamon together and then combined it with the apples until they were coated well and cinnamon-y.

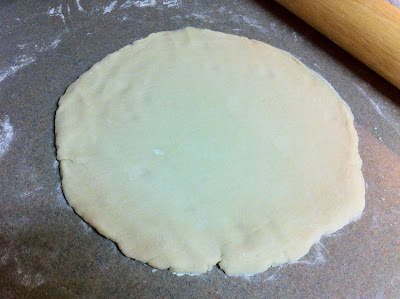
Next was the hard part. I made sure to flour the rolling surface very well. I also floured my hands well while removing the dough from the bag and laying it on the surface. Once it was on the surface I floured the dough all over thoroughly and floured the rolling pin thoroughly. The dough rolled out quite easily actually. I got pretty excited.

looks like a nice, normal pie crust dough, huh?
More like attack of the killer banana pie crust! Getting the dough from the counter and into the pie dish was everything a terrible nightmare would be just short of Freddy Krueger. Seriously. No, I'm exaggerating. It was pretty annoying though. I'd say on par with trying to find parking downtown on a weekend evening.
So I fought and I fought. The dough didn't just pick up in one piece the way the shortening crust did. It was all over the place, dripping into pieces. I got it into the pie dish in sections and pieces, but each had to be majorly floured up as well as my hands because the dough was sticking to me like crazy. The shit was bananas. Literally. Here is how it all turned out looking: (speaking of Fred Krueger, it kind of resembles him)

yikes
 Next I poured the apple mixture into the crust, poured the caramel syrup over the apples and threw the pecan pieces on top just like the last time. Oh yeah, and oven preheating time. 400 degrees.


I wound up using some of the second ball of dough because so much of the first ball was sticking to everything and unusable. That left probably only 1/2 to 3/4 of the top crust dough. I had already planned to try that "fancy" zig-zag style using strips of dough you always see in magazines and other fancy baking paraphernalia. That worked out decently but I wish I had just a little extra dough than what I had. Next time I would up the amount of ingredients that way I'd be covered for the loss of that percentage of dough. So I rolled out the second ball of dough onto my intensely floured surface and cut it into strips. I had to make sure the surface was floured well enough and then I floured the top of the dough strip was well floured also so that it wouldn't stick and rip apart while lifting them. It all worked out decent I suppose, but it was a stretch - literally. Having a little more dough would have made this part easier because I do feel I was having to stretch out what I did have (and in the end when it was done baking some of the parts did unattach from the outter rim of crust). Sad slant face. I couldn't even flute the crust this time because there really wasn't enough dough present to flute. Although for a rough draft or first experiment I have to say it didn't look too awful going into the oven, or coming out for that matter. It baked at 400 degrees for 45 minutes.

about to go in

coming out
I'm sure the pie is supposed to sit and cool for like 45 minutes to an hour but I was impatient and had a slice. The center actually came out a little runny. Not sure if it's because I used less apples or if because I didn't let the pie fully cool before I dug into it. I asked Susie how the other pie turned out and she said not runny at all. So not sure there..Oh wells.

messy, messy

It was definitely more of a challenge to get the pie slice out because the crust really baked itself to the pie dish. Maybe that's because this time I used a glass pie dish and last time I used a disposable pie pan. The crust that wasn't covered by apples definitely turned out more crispy. Either way the crust turned out pretty good. I'd say delicious.

banana crust!

Overall I'd say pretty yummy. Worth the battle it took to create - at least knowing that it's better for my body in the long run vs the convenient shortening.

Friday, January 14, 2011

Susie's caramel apple pie

My friend Susie loves apple pie. I wanted to make her one, this being my first adventure of both making a pie crust from scratch (for an actual pie) and making an apple pie. Two things about this recipe bother me (1- shortening, 2- caramel ice cream topping). I have been looking into healthy all-natural alternatives to things like shortening or corn syrup but for the sake that I still consider myself a beginner in the learning process *and* that I was making this as a delicious gift for a friend, I overlooked it.
So the first thing I did was use my pie crust recipe (the same one I used when making those "unnamed pastries" aka "dinosaur claws")
Ingredients:

2 cups flour
1 tsp salt
1 cup shortening
1/2 cup water

As always I threw all these ingredients into the mixer's bowl and let the mixer handle that.
Once it was all mixed and doughy, I divided them into two halves (rolled them into balls), put them into a ziploc bag and into the fridge for at least two hours.

mmm, juicy

Now, apple time. Here are my ingredients for the actual pie filling:

3/4 cup white cane sugar
3 tbsp cornstarch
1/2 tsp ground cinnamon
6 cups thinly sliced apples (I used 3 apples and the pie was heaping)
1/2 cup caramel ice cream topping (I used Hershey's)
1/4 cup chopped pecans


First thing I did was peel and slice the apples into thin bite-sized pieces. Next I mixed the 3/4 cup of sugar, 1/2 tsp of cinnamon and 3 tbsp of cornstarch together into a bowl together.


Next the apples and the sugar/cinnamon/cornstarch mix get together!


 The apple slices should get nicely coated in the mixture. It seems kind of dry at first but the juice from the apples comes out and absorbs the mixture. The bottom of the bowl will fill up with a thin syrupy type apple/cinnamon sauce.

Now I took the pie crust dough out of the fridge and flowered a surface to roll it out on. I rolled one of the balls of dough out into a circular shape, trying to keep it a little bit wider than the size of a pie pan. (Leaving the second ball of dough for the top crust)


leaving excess dough around the border left space for the dough to sink into the pan
Next I carefully maneuvered the limp shell into the pie pan and shaped it out.


..and poured the apple slice mixture into the unbaked pie shell.

see the heaping apples? I think 3 was maybe a bit too much
Next I drizzled the 1/2 cup of caramel over the apples and let it sink into the pie through the apples.


I should have already had the pecans chopped but it slipped my mind until it was their time to enter the recipe, so I chopped 1/4 of a cup's worth of pecans.


..and sprinkled them over top of the apples..


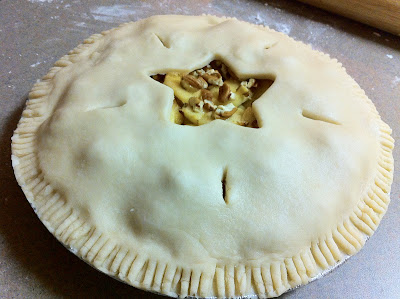
Next I floured the counter again and rolled out the second dough ball for the top crust. I decided to get creative and cut out a star in the middle. I wished I had smaller shapes but all I had was cookie cutters from Christmas - and a star went better than a tree or a gingerbread man. I cut out one big star in the center of the crust top. Actually, I had to do this twice because the first time I tried to lift the dough onto the pie top, it ripped due to lack of flour on the counter surface. So, if any readers intend on trying this recipe, make sure to use plenty of flour on the surface so the dough doesn't stick to your rolling surface. About this time I also preheated the oven to 400 degrees.


Next I "fluted" or "crimped" the outside edge of the crust. I used a fork but I just found this video [How to flute a pie crust] and I like that lady's finger technique (that's what she said)

flutes

When making apple pies, slits in the top crust need to be present to allow steam to escape while baking. Now the pie was ready to head into the oven for 45-50 minutes OR UNTIL GOLDEN BROWN <--that gets old hearing and saying. There should be a better phrase for that by now. Hrmmm..

ready to get baked!!!!
45 minutes later...


Some of the pie juice baked itself out of the seam where the crust was fluted, that's why I was saying I think three apples or 6 cups may be too much, 5 cups or even 5 1/2 would probably be the perfect amount. I don't know how this pie tasted because I gave it away but I heard it was delicious aside from the crust being on the salty side. The salt may need to be cut out or cut down, or it also could be that I cook with coarse sea salt and the bigger salt crystals are too much for this recipe..?.. Hmm, guess I'll have to make more crusts and pies to find out. Who wants one?